> ## Documentation Index
> Fetch the complete documentation index at: https://docs.trynota.ai/llms.txt
> Use this file to discover all available pages before exploring further.
# Schedule
> You can schedule your workflows to run automatically at specific times using our built-in scheduler. This allows for powerful automation without manual intervention.
# 🗓️ Workflow Scheduling Guide
This guide explains how to schedule automated runs for selected workflows in your application. You’ll learn how to:
* Select workflows
* Create a new schedule
* Update an existing schedule from the calendar view
***
## ✅ Step 1: Select Workflows to Schedule
To begin scheduling, first select one or more workflows from the list.
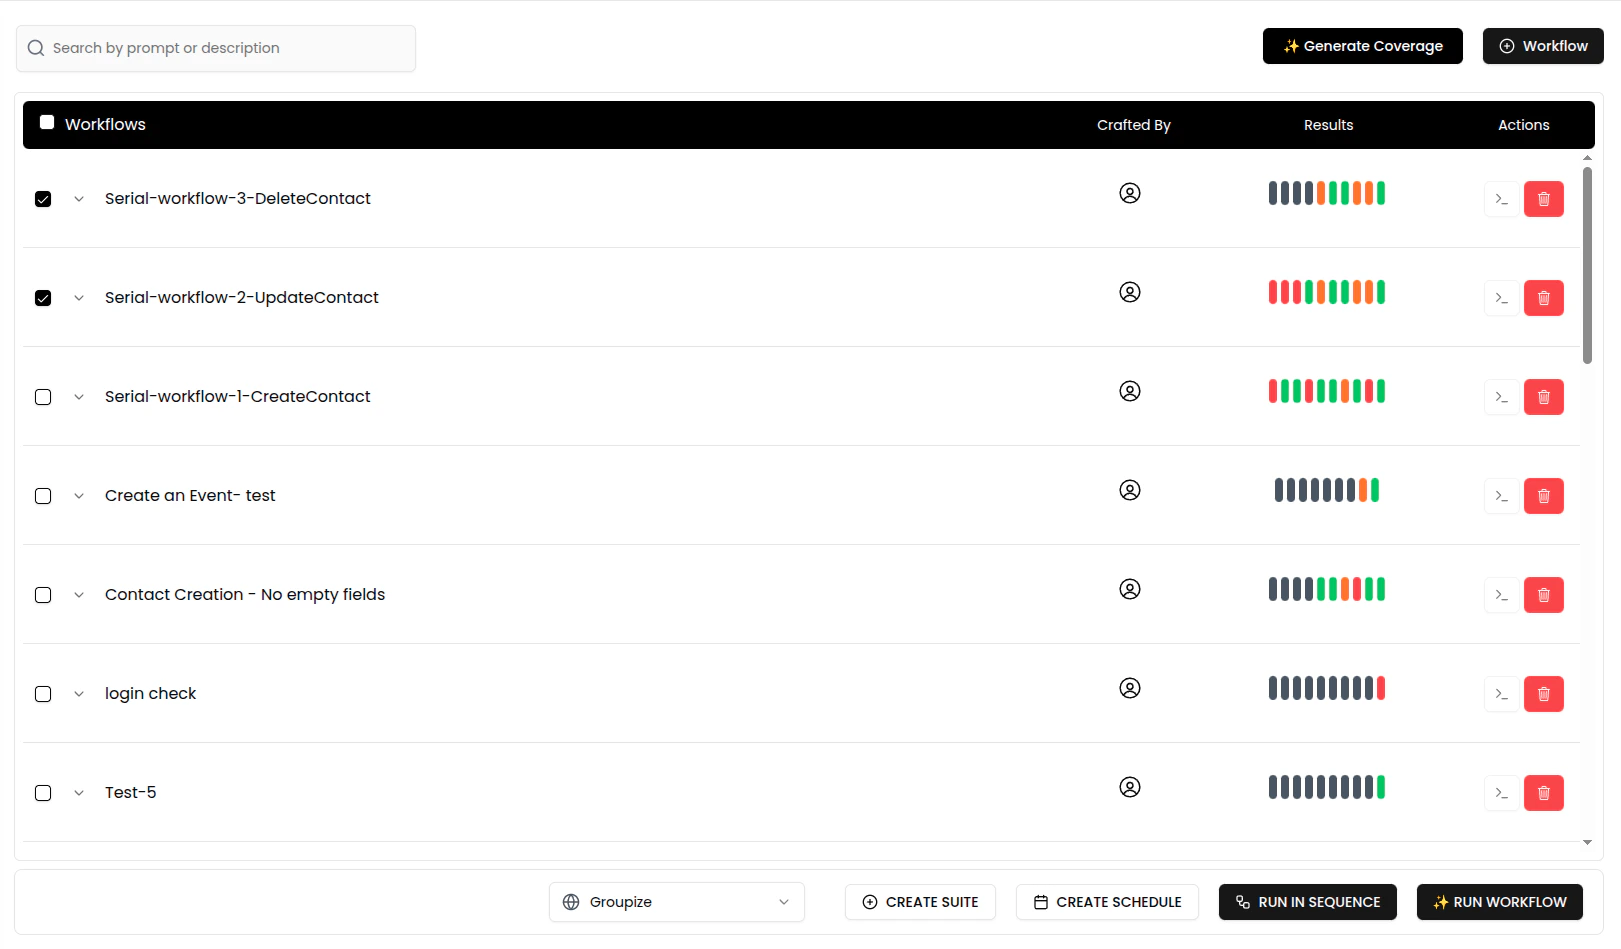 1. Tick the checkboxes next to the workflows you want to schedule.
2. Use the environment selector at the bottom (e.g., `dev tour camp`) to choose the context.
3. Click the **Create Schedule** button to open the scheduling form.
***
## 🕒 Step 2: Create a Schedule
Fill out the schedule form to define when and how often the selected workflows should run.
1. Tick the checkboxes next to the workflows you want to schedule.
2. Use the environment selector at the bottom (e.g., `dev tour camp`) to choose the context.
3. Click the **Create Schedule** button to open the scheduling form.
***
## 🕒 Step 2: Create a Schedule
Fill out the schedule form to define when and how often the selected workflows should run.
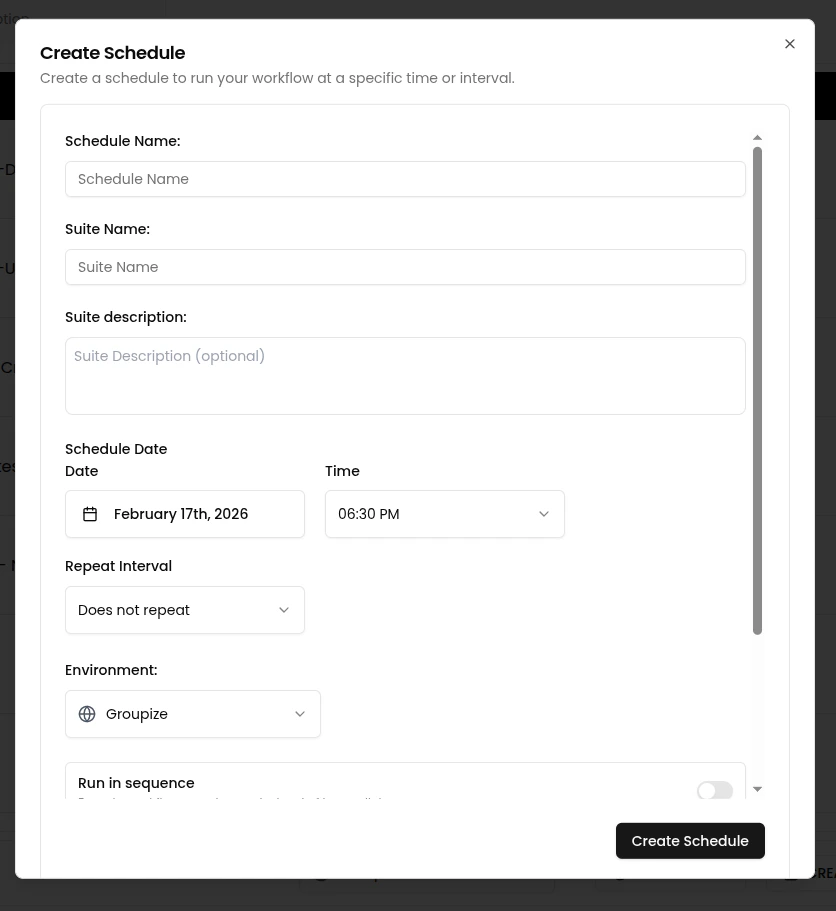 ### Fields to Fill:
* **Schedule Name**: A descriptive name for the schedule.
* **Suite Name**: Logical grouping for the selected workflows.
* **Suite Description** *(optional)*: Notes or purpose of the schedule.
* **Schedule Date & Time**: The first run time for this schedule.
* **Repeat Interval**: Choose from Daily, Weekly, or custom intervals.
* **Environment**: Target environment where the workflow will run.
### Additional Options:
### Fields to Fill:
* **Schedule Name**: A descriptive name for the schedule.
* **Suite Name**: Logical grouping for the selected workflows.
* **Suite Description** *(optional)*: Notes or purpose of the schedule.
* **Schedule Date & Time**: The first run time for this schedule.
* **Repeat Interval**: Choose from Daily, Weekly, or custom intervals.
* **Environment**: Target environment where the workflow will run.
### Additional Options:
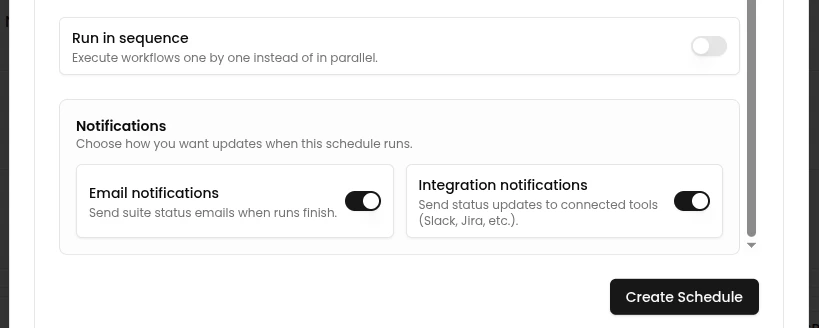 * **Run Mode**: Select **Sequence** or **Parallel**.
* **Notifications**: Toggle **Email** or **Integration** notifications.
Click **Create Schedule** to save and activate it.
***
## 🔄 Step 3: Update or Manage Your Schedule
You can later modify your schedule directly from the calendar view by clicking on an existing scheduled entry.
* **Run Mode**: Select **Sequence** or **Parallel**.
* **Notifications**: Toggle **Email** or **Integration** notifications.
Click **Create Schedule** to save and activate it.
***
## 🔄 Step 3: Update or Manage Your Schedule
You can later modify your schedule directly from the calendar view by clicking on an existing scheduled entry.
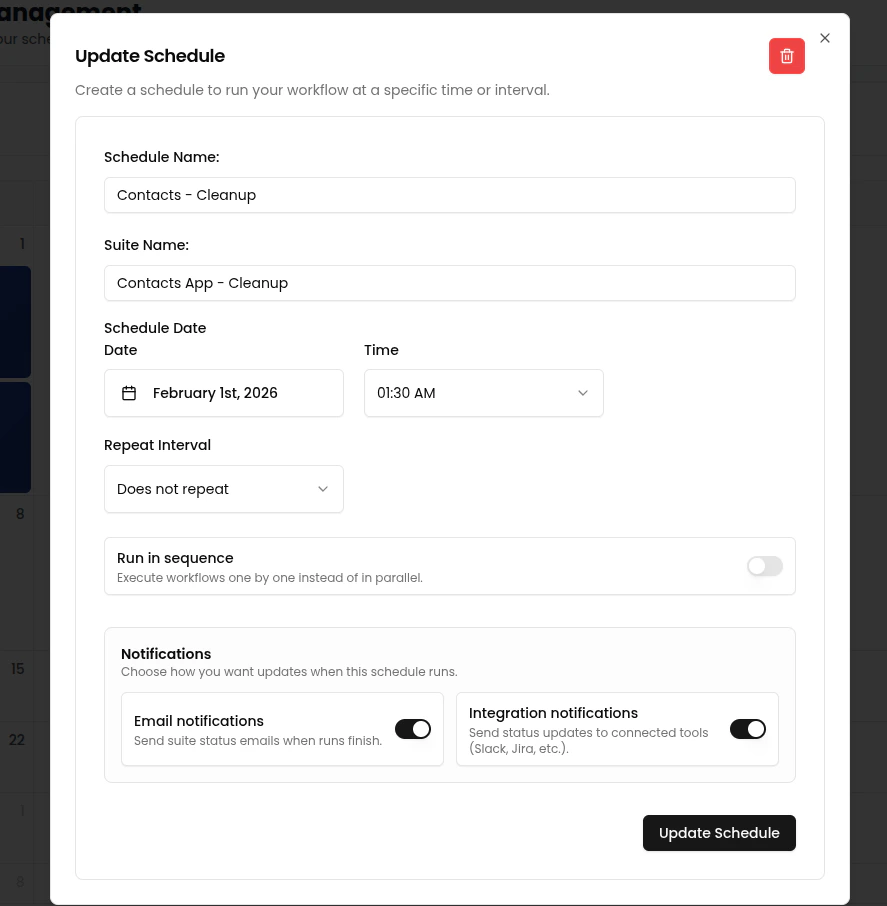 ### What You Can Update:
* Schedule name or suite name
* Run date or time
* Repeat interval
* Delete the schedule using the red trash icon
Click **Update Schedule** to save your changes.
***
## 📧 Notification Details
When notifications are enabled, Nota sends emails after each scheduled run completes. The notification includes:
* **Run summary** — total workflows run, passed count, failed count, skipped count
* **Triage breakdown** — if failures include triaged results, the email highlights the count of **Real Bugs** and **Env Failures** separately, helping you prioritize which failures need immediate attention
* **Direct links** — click through to view the suite results, filtered by status
> For more on how failures are categorized, see [Triage Categories](/view-artifacts/triage).
***
## 📌 Notes
* Scheduled workflows run automatically based on your selected interval.
* Edits are reflected immediately in the calendar view.
* Deleting a schedule stops all future runs for that suite.
Need help? Reach out via support or join our user community!
### What You Can Update:
* Schedule name or suite name
* Run date or time
* Repeat interval
* Delete the schedule using the red trash icon
Click **Update Schedule** to save your changes.
***
## 📧 Notification Details
When notifications are enabled, Nota sends emails after each scheduled run completes. The notification includes:
* **Run summary** — total workflows run, passed count, failed count, skipped count
* **Triage breakdown** — if failures include triaged results, the email highlights the count of **Real Bugs** and **Env Failures** separately, helping you prioritize which failures need immediate attention
* **Direct links** — click through to view the suite results, filtered by status
> For more on how failures are categorized, see [Triage Categories](/view-artifacts/triage).
***
## 📌 Notes
* Scheduled workflows run automatically based on your selected interval.
* Edits are reflected immediately in the calendar view.
* Deleting a schedule stops all future runs for that suite.
Need help? Reach out via support or join our user community!