> ## Documentation Index
> Fetch the complete documentation index at: https://docs.trynota.ai/llms.txt
> Use this file to discover all available pages before exploring further.
# Figma Mode
> Read live Figma files to generate UI/UX-aware test suites.
## Overview
Figma Mode connects to your design file, interprets frames, components, variants, and prototyped flows, then turns them into actionable tests. It catches broken states early by comparing intended interactions against the latest handoff artifacts.
Understands variants, breakpoints, and nested components for smart
selectors.
Reads prototype links to predict happy paths and edge transitions.
***
## Inputs Required
* Figma file link with **can view** or higher permissions.
* Description of the flows or personas you care about.
* Optional UX notes (e.g., "animations are critical" or "dark mode parity").
Private teams sometimes block API access even with shared links. Confirm the
service account has at least viewer access.
***
## Step-by-Step
1. Start **Coverage Agent → Figma Mode**.
2. Paste the Figma link; include page or frame names if the file is large.
3. Mention the use case ("new billing review component" or "mobile nav").
4. Run generation. The agent parses layers, components, and flows.
5. Review the output: tests grouped by component/flow plus a gap analysis table.
6. Ask for deliverables like "produce accessibility checklist" or "map to Jira epics".
***
## Provide the Figma Link
Figma Mode only accepts links—no file uploads. Follow the flow below to make sure the system can fetch the right design.
1. Click the **Figma** chip under the composer to open **Linked sources**.
2. Paste the share link straight from Figma.
3. Select **Add**. Nota fetches the design metadata, variants, and interactions, then reflects the linked source in your chat context.
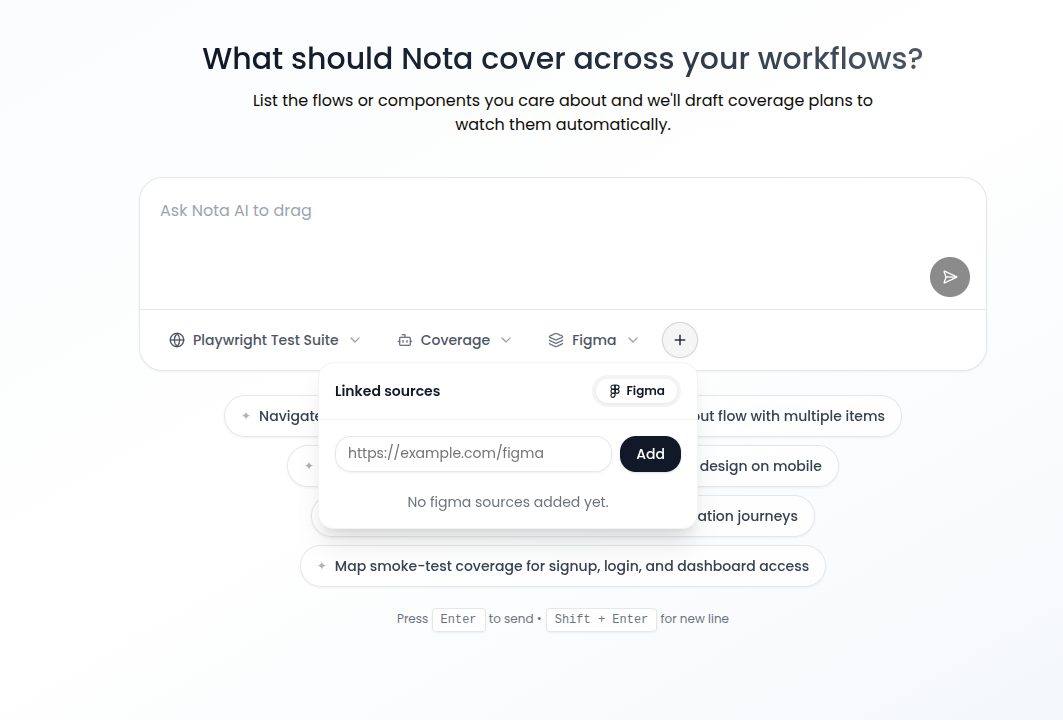 *You’ll see the link appear in the source list, confirming that Nota can read the design before analysis begins. Full-size preview: `/images/new-chat/figma-link.png`.*
Ensure the Figma file grants at least **Can view** access to the Nota service
identity. Private links without access will fail silently.
***
## Required Access Token
Add a valid Figma personal access token in **Integrations → Figma** before running Figma Mode. Coverage uses that token to call the Figma API behind the scenes.
1. Create a Figma personal access token (profile → **Settings** → **Personal access tokens**).
2. Open the **Integrations** page in Nota and select the **Figma** card.
3. Paste the token into **Figma Access Token** and save. No redeploy needed.
When creating the token, enable scopes **file\_content:read**, **file\_metadata:read**, and **file\_version:read**. If you rotate the Figma token, update it in **Integrations → Figma** so Coverage runs keep working.
***
*You’ll see the link appear in the source list, confirming that Nota can read the design before analysis begins. Full-size preview: `/images/new-chat/figma-link.png`.*
Ensure the Figma file grants at least **Can view** access to the Nota service
identity. Private links without access will fail silently.
***
## Required Access Token
Add a valid Figma personal access token in **Integrations → Figma** before running Figma Mode. Coverage uses that token to call the Figma API behind the scenes.
1. Create a Figma personal access token (profile → **Settings** → **Personal access tokens**).
2. Open the **Integrations** page in Nota and select the **Figma** card.
3. Paste the token into **Figma Access Token** and save. No redeploy needed.
When creating the token, enable scopes **file\_content:read**, **file\_metadata:read**, and **file\_version:read**. If you rotate the Figma token, update it in **Integrations → Figma** so Coverage runs keep working.
***